Kitchen & Bathroom Measuring Guides: Professional Templates for Accurate Dimensions
Accurate Measurements: The Foundation of a Flawless Kitchen & Bath Design
Embarking on your kitchen or bathroom renovation? It all starts with precise measurements. This comprehensive guide will walk you through the essential steps to accurately measure your space, ensuring your new cabinets, countertops, and bathroom vanities fit perfectly and your design vision becomes a reality. Whether you're a seasoned contractor or a DIY homeowner, taking accurate measurements upfront saves time, prevents costly errors, and sets the stage for a successful renovation project.
Download Our Professional Measurement Templates
To help you capture all the necessary details for your kitchen cabinets, bathroom vanities, or countertop project, we've created downloadable measurement sheets. Use these templates to sketch your space and record your measurements as you go, ensuring nothing is overlooked in your renovation planning.
Need Expert Measurement Assistance?
While accurate DIY measurements are often sufficient, for complex layouts or if you prefer professional precision, our team can help. Contact us to discuss options for measurement assistance tailored to your project needs. We're here to ensure your measurements are spot-on, setting your project up for success from the very beginning.
Contact Us for Design HelpWHAT TO MEASURE: Key Details for Your Kitchen & Bath Design
These measurement details are crucial for creating a functional and beautiful space that perfectly fits your home. Accurate measurements allow our design team to create precise 3D renderings and ensure your chosen products will integrate seamlessly into your existing space.
Diagram 1: The Room Floor Plan - Mapping Your Space
(Start from left to right and top to bottom. Measure all dimensions from A to H as shown in the diagram below)
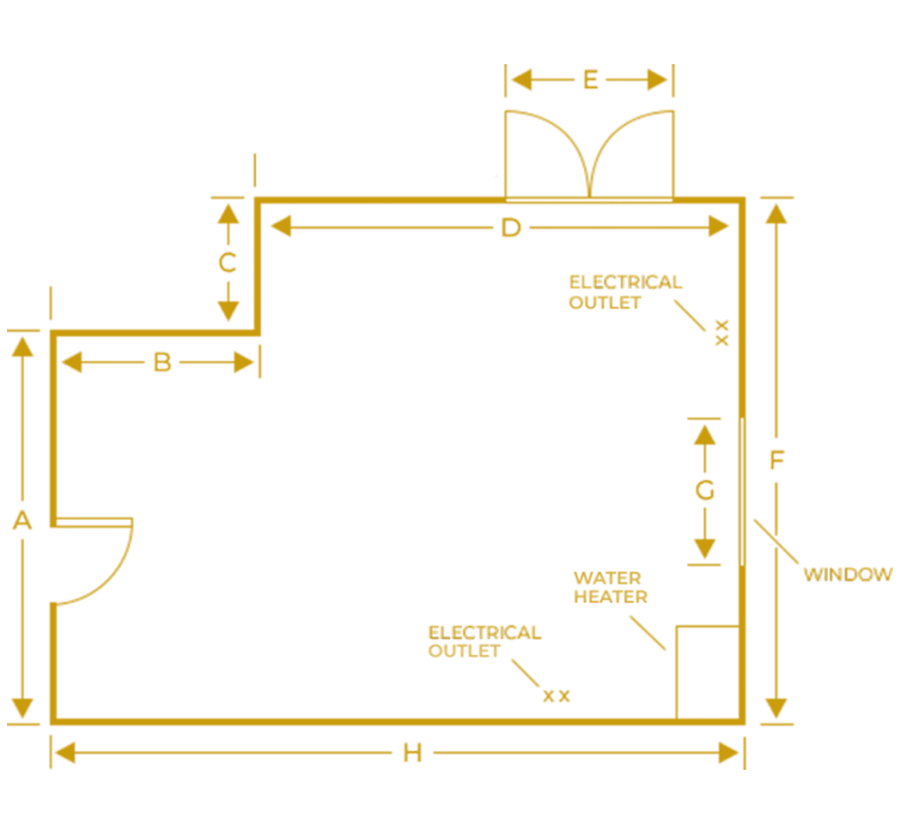
- Wall-by-Wall Dimensions: Carefully measure the length of each individual wall in your kitchen or bathroom. Include all walls, even short sections or those interrupted by doorways. Your room may be square, rectangular, L-shaped, T-shaped, or have unique angles – measure each wall segment accurately.
- Window and Door Openings: For each window and door:
- Measure the Width of the Opening: Measure the width of the window or door opening itself (the space within the frame).
- Measure the Height of the Opening: Measure the height of the window or door opening.
- Mark Location on Your Sketch: Clearly indicate the position of each window and door on your floor plan sketch, noting which wall they are on.
- Swing Direction (Doors): Note which way each door swings open (inward or outward) and whether it's an exterior or interior door.
- Existing Features & Obstructions: Locate and measure the following on your floor plan:
- Electrical Outlets & Switches: Mark the location of all electrical outlets and light switches on the walls.
- Plumbing Fixtures: Indicate the location of existing plumbing lines, water supply pipes, and drain pipes.
- Fixed Objects: Note the position and dimensions of any fixed objects that cannot be moved, such as:
- Water heaters
- Radiators
- Boxed-in pipes or ductwork
- Support columns or posts
- Existing structural elements
Diagram 2: Wall Height & Vertical Dimensions - Capturing Room Elevation
(Start from left to right and top to bottom. Measure all dimensions from A to D as shown in the diagram below)
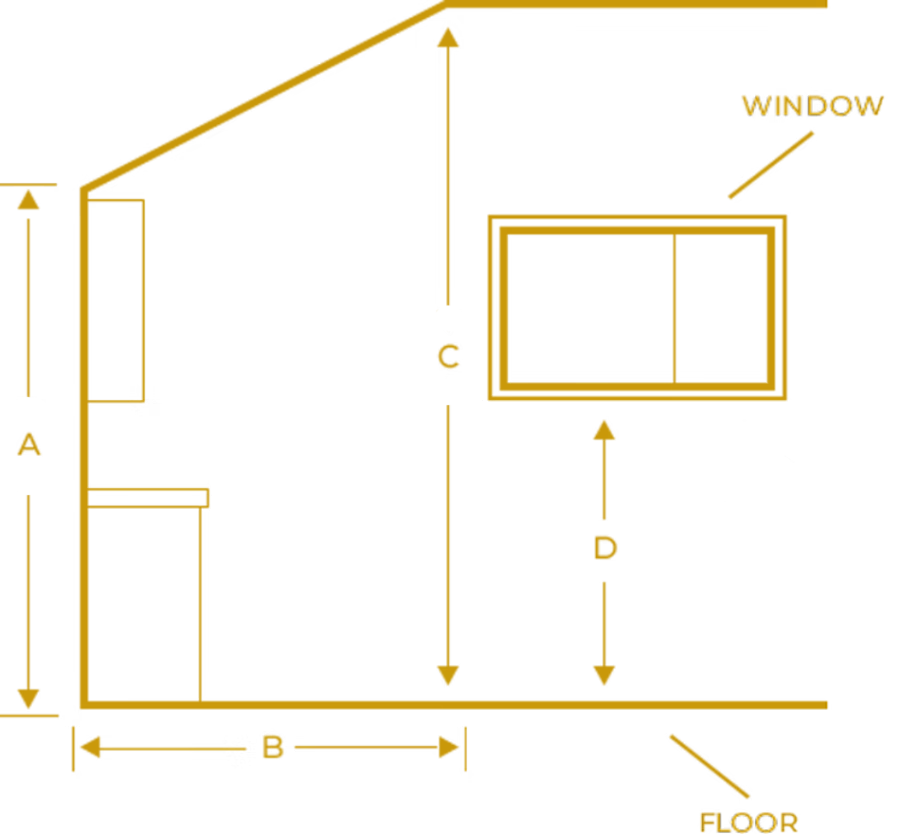
- Ceiling Heights (Variable Ceilings): If your room has a sloped ceiling, vaulted ceiling, or eaves:
- Measure Tallest Height (C): Measure the maximum ceiling height in the room.
- Measure Shortest Height (A): Measure the minimum ceiling height (e.g., at the lowest point of a slope or under eaves).
- Eave Depth (B): Measure how far the eave or sloped ceiling extends horizontally into the room from the wall.
- Window Sill Height (D): Measure the distance from the finished floor to the bottom edge of each window sill. This is important for cabinet placement below windows.
Diagram 3: Countertop Dimensions
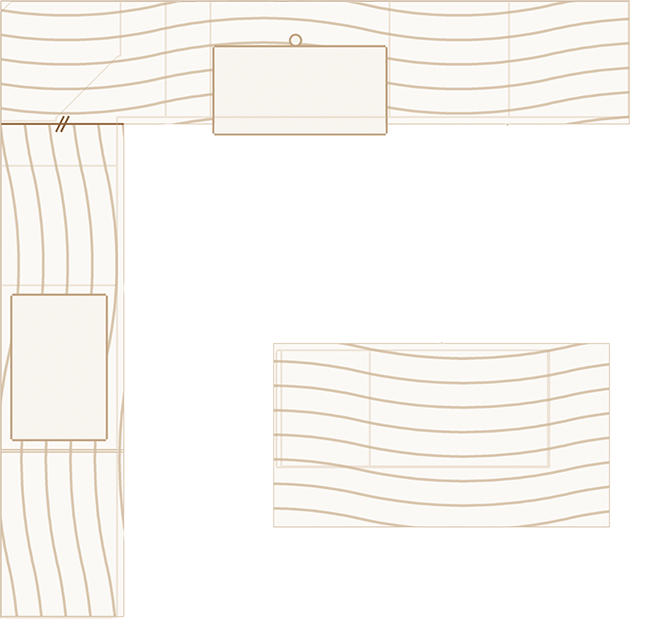
This diagram focuses on the specific dimensions needed for your countertops, including standard countertop measurements and considerations for kitchen islands.
- Countertop Overhang: If you are replacing countertops, measure the desired overhang beyond the cabinet base for seating or design preference. The overhang is the portion of the countertop that extends past the front edge of the cabinets. Standard overhangs for base cabinets are typically around 1-1.5 inches, providing a comfortable reveal and protecting cabinet faces. For seating areas at islands or peninsulas, a larger overhang is necessary to allow legroom.
- Countertop Width (Standard): Measure the width of the countertop from the wall edge to the front edge of the cabinet base. Standard base cabinet depth is typically 24 inches, resulting in a standard countertop width of approximately 25 inches or 25 1/2 inches to account for a slight front overhang. Note if your existing countertops deviate from this standard width.
- Island Overhang (Seating & Design): For kitchen islands or peninsulas where you plan to have seating, the island overhang is crucial for comfortable legroom and counter stool placement. Measure the desired overhang distance beyond the cabinet base on all sides where seating will be located.
- Seating Overhang Depth (Front & Sides): A minimum overhang of 12 inches is generally recommended for comfortable counter-height seating. For bar-height seating, a 15-inch overhang or greater is often preferred. Consider the type of stools you plan to use and the desired seating comfort when determining the overhang depth.
- Measure Overhang from Cabinet Edge: Measure the overhang distance horizontally, starting from the outer edge of the island cabinet base and extending outwards to where you want the countertop edge to be. Measure this overhang distance for each side of the island where seating is planned.
- Consistent or Variable Overhang: Decide if you want a consistent overhang depth around the entire island or if you want different overhangs on different sides (e.g., a larger overhang for seating on one side and a smaller decorative overhang on another). Measure each desired overhang separately.
- Support Considerations (Large Overhangs): For island overhangs exceeding 12 inches, especially for heavier countertop materials like quartz, countertop supports or brackets may be required to ensure stability and prevent cracking. Consult with your countertop fabricator or installer regarding support requirements for your chosen overhang dimensions and material.
Why Island Overhang is Important:
Accurate island overhang measurements are essential for:
- Comfortable Seating: Ensuring adequate legroom for comfortable seating at your kitchen island.
- Proper Counter Stool Fit: Allowing space for counter stools to be tucked under the overhang when not in use.
- Design Aesthetics: Creating a visually balanced and functional island design.
- Fabrication Accuracy: Providing your countertop fabricator with the precise dimensions needed to create your custom island countertop with the correct overhangs.
Tips for Accurate Measuring:
- Use a Measuring Tape: Use a sturdy metal measuring tape for accuracy. Cloth tapes are not recommended for precise measurements.
- Measure Twice, Record Once: Always measure each dimension twice to double-check your accuracy before recording the measurement.
- Measure in Inches (or Millimeters - as preferred): Be consistent with your unit of measurement throughout the process.
- Measure to the Nearest 1/8 Inch (or Millimeter): Precision is key.
- Measure from Wall to Wall: Ensure your measuring tape is straight and level against the walls for accurate wall-to-wall measurements.
- Account for Obstructions: Carefully measure around any obstacles like pipes, corners, or doorways.
- Take Photos: Take photos of your space from different angles, noting any unique features or challenges. Photos can be helpful for reference during the design process.
Ready to Design Your Dream Space?
Once you have your measurements, our expert design team is ready to help you bring your vision to life. Contact us today to discuss your project, explore our product collections, and get started with your free 3D kitchen or bath design!
Contact Us for Design Help